1. Place a crushed Daim bar in a heatproof bowl. Place the bowl on a saucepan with a little hot water in. Place on a medium heat until the water starts to simmer, turn the heat to low. The chocolate will melt and the crunch caramel inside will start to melt too, remove from the heat once most of the Daim has melted.
2. Heat the milk in a saucepan slowly to boiling. Place the yolks and sugar in a heatproof bowl, whisk together briefly until combined and creamy.
3. Slowly pour the hot milk over the egg yolk mixture, whisking to mix together. Pour the mixture back in to the saucepan, over a medium heat, stir with a wooden spoon until it starts to thicken slightly, coating the back of the spoon. Remove from the heat. Stir the melted Daim through and set aside to cool, then place in the fridge in a covered bowl or container. Leave for at least a few hours until very chilled.
4. Stir the single cream and vanilla through the cooled mixture and pour in to your ice cream machine bowl (according to the instructions) until thickened and freezing. Meanwhile, break the other Daim bar in to small pieces (I bashed mine gently, still in the wrapper, with a rolling pin) Stir half through the ice cream mixture. Place in a container, sprinkle over the rest of the Daim pieces, cover, and pop it in the freezer.
*If you’re not using an ice cream machine you can place the chilled mixture in a container and freeze. Remove from the freezer every hour or so and beat to break up the ice crystals. This will help get a smoother creamy texture. Continue until set.
Delicious on its own or in a wafer cone. Use within a week. Enjoy ♥
I am having a clear out of some of my props. Here’s a few on offer. I am based in the UK near Gatwick for collection. For extra p&p I may be able to post non bulky, unbreakable items. These have all been used for styling and display and I wouldn’t recommend them for food prep use due to age and condition.
SOLD stc. Beautifully rustic scales and weights. £15
Cake pans, cookie cutters, small metal moulds. £10
SOLD. Rustic metal pans. 4 x saucepan smallest diameter 6.5 cm up to 10 cm. 4 x frying pans smallest diameter 9.5 cm up to 15 cm. Decorative use only. £10
SOLD stc. Pretty glass jar with metal lid and spoon. Glass is 12 cm high plus the lid. Patina to lid. £5
SOLD One large round grater, one small grater. Rustic metal with character. £5
One aged metal with frill cake stand. One glass footed stand and one tiered small bonbon stand. £10
SOLD Coffee Grinder works and looks good £5
SOLD. Vintage Cake Stand Black & Gold Fleur De Lis £15
I have lots more items including loads of cutlery, glasses, cake stands…….If you have a genuine interest in buying several items I’d love to hear from you, drop me an email on the contact page or message me on Facebook or Instagram ♥
Thought I’d create something with 2 of my favourite things, shortbread and lemon. These are delicious. I prefer my shortbread really golden so tend to bake for a little longer.
Beat together the soft butter and caster sugar until light and fluffy. Add the zest and flour (and essence if using) bring together as a ball of dough. Preheat the oven 190°C fan 170°C GM5. Place the dough in a bag or wrap in clingfilm and chill for 30 minutes.
Grease or line a 7” (18 cm) square baking tin, I used a cake tin with a removable base. Roll the dough out on a lightly floured surface to roughly the size of the baking tin. Lift inside and gently press the dough in to the edges, try to create an even top, I used a plastic scraper to help. Use a fork to prick holes across the surface and then bake until golden across the top. Approximately 25-30 minutes. Although the top can be golden looking the base takes a little longer sometimes.
Allow to cool slightly, until the shortbread starts to harden, then remove from the tin, it can break easily so be careful. At this stage I usually slice it as I find it breaks less than when completely cold. Or at least use a knife to mark out where you’ll cut when cold. I sliced across the centre and then cut each half in to 7 even slices. Allow to cool.
Mix enough lemon juice in to the icing sugar to create a mixture that will drizzle but still hold some of its shape. Pipe or drizzle with a spoon across the top of each slice. Leave to firm up and store in an airtight container. Enjoy♥
Although I love using natural light for a lot of my food photography, sometimes it’s just not an option. The UK has many days when the sun does not appear and when it does it’s not for long enough! So I have a few lights at hand to make sure I’m not limited.
The Pixapro Glowpad 350 works really well for me and also means I can control where the light is used and how much light. It’s amazing how much difference moving the light makes to the end result.
Check out my video to how see how I created the images.
I had great fun creating these images and putting it in to a video for Essential Photo using some of their brilliant Pixapro Glowpad lights. Excellent slim LED light panels that are battery operated which makes them super portable.
All the messy stuff was done before videoing, testing consistency and balancing spoons were definitely the hardest and stickiest bits! Worth practising and making sure you use items that wipe clean easily. We fashioned a box (from discarded packaging) using bluetack to secure the spoons as they need to be able to withhold whatever you’re pouring on to them.
You could use this idea to create your own food ‘art’ images using honey, sauce, syrups etc. Just have a test run with pouring first to make sure you have a good flow and catch what you pour underneath so you can keep recycling. Enjoy ♥
I do love a coffee cake but don’t make them often as I’m the only one here that likes them, which means I end up eating most (by most I mean all) of it!
I decided a cake crossed with a sugary drizzle topping could be worth experimenting with. It was lovely and I did share it with a few visitors and my Dad, honest I shared 🙂
The loaf tin I used measured 11 cm x 22 cm at the widest and 6 cm deep, line the base and grease the sides.
Preheat oven to 180°C 160°C fan GM4
Mix the coffee and boiling water together, set aside and allow to cool completely before making the cake.
Beat the soft spread/butter with the soft brown sugar until light and fluffy. Add the egg in 3 additions mixing well, if it looks like it’s curdling add a tbsp. or 2 of the flour. Mix briefly on med/high speed to combine until smooth.
Sieve in the flour and baking powder, also add 2 tbsp. of the cooled coffee mixture. Beat until all combined and smooth. Spoon into the prepared loaf tin and bake until firm to the touch and a skewer comes out clean when inserted in to the centre 30-40 minutes.
Place the cake, still in the loaf tin, on a cooling rack. Mix the remaining coffee mixture with the granulated sugar. Use a skewer to make holes across the cake top then, whilst it’s still hot, spoon the drizzle mix over. Leave to cool completely in the tin. To remove loose the sides and gently tip on to a plate and then place a plate on the bottom and turn over, this way the crunchy sugar is on the top. Enjoy ♥
Ingredients
350g caster sugar
300ml semi skimmed or full fat milk
100g butter, chopped in to chunks
100g white chocolate, chopped
100g glacé cherries, chopped roughly in to quarters
1 tsp vanilla extract or bean paste
Line an 18cm (7”) square tin with parchment or baking paper. Put a plastic cup of water in the freezer to chill for later if using. Place the sugar, milk and butter in a large saucepan. Heat on low, stirring regularly, until melted together.
Increase the heat to bring to a rolling boil, stir occasionally to stop any areas on the bottom ‘catching’. Ideally use a sugar thermometer to measure 118°C (softball)* to double check it’s the right consistency you can drop a little mixture in to the chilled cup of water, remove from the water with a spoon, if it balls up rather than dispersing it’s ready.
*I have many sugar thermometers and find that they can vary readings by several degrees, very frustrating when on many sugar/sweet recipes this reading is crucial. To be sure use the dropping in to cold water method.
Remove from the heat and stir through the vanilla. Add the chopped white chocolate and about ¾ of the chopped cherries and stir well. The chocolate will melt in as you stir.
Beat vigorously for a few minutes, you can use your mixer or by hand, it will thicken slightly and you’ll notice that any mixture on the sides is starting to set. Pour in to the square tin and even out then dot the remaining chopped cherry pieces on the top and leave to cool completely.
Once completely cooled remove from the tin. Cut in to cubes using a sharp knife. If it’s still a little soft and squishy leave out to harden for a few hours, just loosely cover with a clean teatowel or kitchen paper. Then place in an airtight container. ♥
Great food deserves some great photos and that’s what you’ll be taking on this food photography workshop. If you’re a home baker, food blogger or just like to share your best bakes on social media then this workshop is for you. High quality photography is also the backbone of any business and if that sounds like you, you’ll be right at home on this workshop.
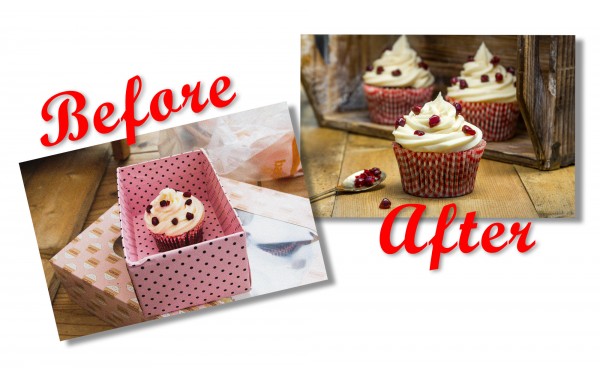
Of course it’s not as simple as pointing your camera at good looking food and as you’ll discover during the workshop, props, backgrounds and camera settings all play their part in creating a photo that looks amazing. The role of post processing or editing your photos is vital too and you’ll learn some simple tricks to improve your images using Photoshop Elements software.
This is a “hands on” workshop with lots of learning by doing rather then watching. We’ll be photographing various baked goods during the day, all of which will be provided by us. All you need to do is bring your camera and get involved.
What camera settings will work to get the best out of your camera
How light plays a vital part in good pictures
What makes a good photo and what doesn’t
How to create easy backgrounds out of things you have at home
Styling tips and tricks to make the best of your baked goods
Post processing to enhance your images ready for social media and websites
Places Available – There will be a maximum of 9 spaces available Location – Copthorne, West Sussex Duration – Approximately 5 Hours including a lunch break (10:30 am Start Time) More information – please Contact us stating your interested in the Food Photography Workshop Other Information – You’ll need a DSLR style camera to get the most from this workshop. A mobile phone or basic compact camera is NOT suitable.
F.A.Q.’s about this workshop. Before you decide to book take a look at the questions and answers below to help give you a little bit more of an insight into what to expect.
Who will be running the workshop? Sam Hoey (www.samskitchen.net) and Gavin Hoey (www.gavtrain.com) will be leading the workshops.
Who is the workshop aimed at? This workshop is suitable for anyone who takes photos for their food blog, baking business, Facebook or social media and wants their photos to stand out from the crowd. We’ll be working with baking and bread items which will all be provided for you.
Where is the workshop located? This workshop will in Copthorne, West Sussex. The hall is located a few minutes from the M23 motorway and has plenty of free parking.
What time does the workshop start? We suggest arriving at around 10.15 for a 10.30 start.
Are refreshments included? Tea or coffee will be available. You’ll need to bring you’re own lunch as there are no shops or restaurants in the near vicinity.
What will I need to bring? For this workshop a Digital SLR style camera and a standard zoom lens (e.g 18-70mm) is ideal. If you are unsure if your camera is suitable please contact sales@gavtrain.com
We are unable to loan out cameras and lenses.
Can I just use my mobile phone? iPhones and the like have great cameras but when it comes to food photography they’re not up to the job. DSLR style camera have interchangeable lenses and large sensors which all help to achieve those lovely blurry backgrounds you see in food photos.
Can I contact you? If you would like to speak to Sam to book or ask a question then you are welcome to call 01342 717428. If no one is available to take your call please leave a message and we will get back to you as soon as we can. Alternatively you can send Sam an email sales@gavtrain.com
Can you recommend somewhere to stay? We have many people who travel long distances to be with us. The nearest large town is Crawley but the venue is also fairly close to Gatwick airport, which means there’s no shortage of places to stay and a wide variety of prices to choose from. If you would like to include an overnight stay with your visit please take a look at the excellent information provided by Trip Advisor. London: Gatwick Hotels
Do you have any tips to get the most from the workshop?
Tip 1: Make sure you bring plenty of spare memory cards and batteries (or charger)
Tip 2: Don’t buy a new piece of equipment just to attend the course, you may not need it.
Tip 3: Don’t panic if you get held up. Just give a call and let us know.
Tip 4: Don’t expect every shot to be perfect. The workshop is all about learning and that means making mistakes
Tip 5: Do have an open mind, everyone’s taste in photography is different.
Cream the butter & sugar until light & fluffy, sieve in the flour & cocoa and mix well until you form a ball of dough. Place the dough in a bag in the fridge for at least 30 minutes.
When you’re ready to shape the biscuits preheat your oven 190°C (fan 170°C) GM 5
Roll out the dough gently on a lightly floured work surface to about 4 mm in thickness. Press out the shapes you would like and place on a greased/lined baking tray. If you’d like to add the little holes to the top then prick these (with a skewer or fork) on half the biscuits before they are baked. I sometimes use my small letter set to add text too.
Bake for about 10 minutes so they are evenly baked top & bottom, they will be firm to the touch and a little darker at the edges. Keep a close eye on them as they can burn easily. Remove from the oven, allow to cool for a minute or 2 then transfer to a cooling rack.
For the icing
Place all the ingredients in the bowl of your mixer apart from the milk(or beat by hand) and combine, then beat until light and fluffy, add a little milk to create a spreadable consistency.
Spread on one of the biscuit bottoms and sandwich together with a top. Will last several days in a tin if they don’t all get eaten straight away! Enjoy ♥


 Grease or line a 7” (18 cm) square baking tin, I used a cake tin with a removable base. Roll the dough out on a lightly floured surface to roughly the size of the baking tin. Lift inside and gently press the dough in to the edges, try to create an even top, I used a plastic scraper to help. Use a fork to prick holes across the surface and then bake until golden across the top. Approximately 25-30 minutes. Although the top can be golden looking the base takes a little longer sometimes.




 125g soft butter


