Nutella Iced Buns

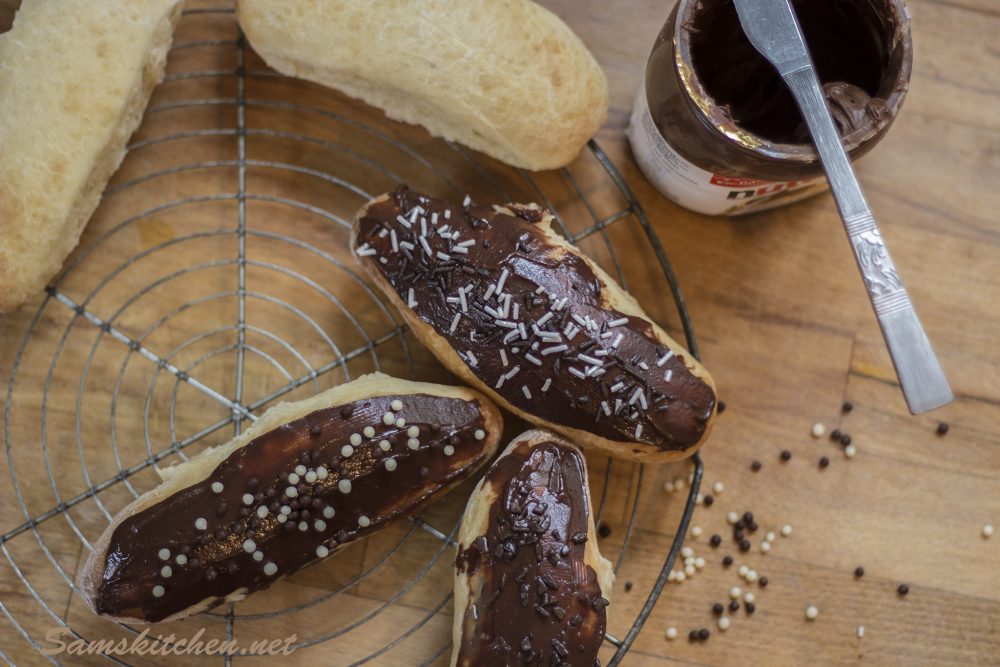
I make iced buns occasionally as a weekend treat, they literally get inhaled here!! So I thought I’d try a Nutella or chocolate spread topping. We all agreed the first bite was “a little different but OK” after that totally addictive. 🙂 Not many photos, as I had to quickly snap a few before we scoffed them!

Nutella Iced Buns (printable recipe)


Ingredients

Nutella Iced Buns 2450g strong white flour

1 tsp salt

5g dried fast action yeast

50g caster sugar

280ml tepid milk

1 egg, lightly beaten

A little milk to brush the tops

Nutella or similar chocolate spread about 3-4 tbsp.

A little just boiled water

Sprinkles (optional)

Makes 12 iced buns

  1. Place the flour in a large bowl, add the salt to one side and the yeast and sugar to the other side. Stir to combine.
  2. Add in the most of the milk and all of the egg, bring everything together with your hands to form a sticky dough (adding a little more of the milk if needed). Take the dough out the bowl and place on the work surface. Gently knead until smooth and elastic in texture, about 5 minutes. You can use a mixer with a dough hook instead of mixing by hand, it will only take a couple of minutes. Place back in the bowl and cover with a damp tea towel or some oiled cling film. Leave in a warm place to double in size, between 1-2 hours.
  3. Remove from the bowl and knock the dough back. Briefly knead. Then divide in to 12 equal portions. Either weigh the pieces to be very accurate or do it by eye.
  4. Roll each piece into a ball. Then roll out into a 10-12cm long sausage shape. Place on a greased/lined baking sheet, repeat until you’ve made all 12, space out over 2 baking sheets so they have room to expand. You may find some shrink back, just roll out a little again and they will hold better. Cover loosely again and leave to double in size somewhere warm, for about 30-40 minutes. Preheat the oven to 200°C (180°C Fan) GM6 400°F.
  5. Brush the tops with milk. Bake for 12-15 minutes until golden brown on top. Cool on a rack. When cooled completely, mix the chocolate spread with a little just boiled water and stir through. You’ll need enough water to make the icing spreadable but not runny. Then spread across the tops of the cooled buns. Add sprinkles if using.
Categories: Uncategorized | Leave a comment

Ginger Biscuits

Ginger Biscuits Printable recipe

Easy to make and delicious, these remind me of childhood holidays to Cornwall. We always bought some Cornish Farthings for my Dad, they came in a tube and the smell when you opened them was lovely and gingery!


Ingredients

170g Self Raising flour
110g soft light brown sugar
1 tsp bicarbonate of soda
1 tsp ginger (more if you like them very gingery!)
60g butter/spread (diced)
1 egg, lightly beaten in a cup
1 tsp golden syrup

Makes 20-25 biscuits preheat oven 180°C (Fan 160°C) GM4

  1. Sift flour, bicarbonate of soda & ginger in a bowl, add the sugar and stir. Add the butter and rub in with your fingertips until of breadcrumb consistency.
  1. With the beaten egg already in a cup, add the syrup and beat until mixed.
  1. Add the wet mixture to the dry and mix together to make a sticky dough.
  1. Roll teaspoons of the mix into balls and place on a lined/greased baking sheet. Flatten slightly and bake for 12-15 mins until golden and cracked.
  1. Cool for 5 mins on the tray before transferring to a cooling rack or enjoy while still warm! The longer baked the harder the biscuit will be, so bake for longer until deep golden if you like them with a snap. Enjoy ♥
Categories: Biscuits, Food Photography, Recipes | Tags: , , , , , , , , , , , , , , , , , , , , , | Leave a comment

Cranberry Easter Biscuits

I wanted to make a variation on the traditional and delicious Easter biscuit. One of us at home is not a huge dried fruit fan but does like cranberries so with those and some orange zest and of course a little spice, these are delicious and have disappeared at speed!


Cranberry Easter Biscuits (printable)

150g soft butter

115g caster sugar (plus a little extra to dust on the top)

Grated zest of ½ an orange

1 egg yolk

225g plain flour

½ tsp baking powder

1 tsp mixed spice

25g raisins

85g dried cranberries (chopped a little if quite large)

Pinch of salt

Makes about 25

Beat the soft butter and caster sugar until light and fluffy.

Sift in the flour, baking powder and mixed spice. Also add the egg, zest, fruit and a pinch of salt. Beat to bring together as a ball of dough. Wrap in clingfilm and place in the fridge for about an hour.

Preheat the oven to 180°C 160°C fan GM4

Roll out the chilled dough on a floured surface to about 4 mm in thickness. Cut out rounds, I used a fluted edged 5.5.cm cutter. Place them on a lined/greased baking tray, allowing some expansion room. Sprinkle a little caster sugar on top of each, spread across the top with your fingers.

Bake until firm and turning golden 10-12 minutes. Allow to cool for 5-10 minutes on the tray then transfer to a cooling rack to cool completely. Enjoy ♥

Cranberry Easter aboveCranberry Easter

Categories: Biscuits, Recipes, Sweet | Tags: , , , , , , , , , , , , , , , , , , , | 2 Comments

Lemon and Chai Seed Biscuits

Chai seeds are one of those supposed super foods, so I guess in a biscuit that means yin and yang, a balance of good stuff and a treat.
Lemon is one of my favourite flavours for sweet treats, if it’s yours too give these a whirl!

Lemon and Chai Seed Biscuits (printable recipe)


For the biscuits

100g soft butter

lemon and chai 340g caster sugar

1 egg yolk

Grated zest of a lemon

2 tsps. chia seeds

1 tsp lemon juice

A few drops of lemon extract or flavouring (optional but makes them more zingy)

175g plain flour

lemon and chai 2

For the icing top

100g sieved icing sugar

Enough lemon juice to mix to a spreadable consistency (1-2 tbsp)

Makes 16-18

  1. Line/grease 2 baking trays. Beat the soft butter and caster sugar together until light and fluffy. Add the chai seeds, yolk and lemon zest, juice and flavouring/extract. Beat together.
  2. Lemon and Chai Seed 1Add the sifted flour and bring together as a ball of dough. Wrap in clingfilm and chill for 30 minutes. Preheat the oven 180°C 160°C fan GM 4. Roll the dough out to a thickness of about 0.5 cm. Cut out rounds of dough (I used a cutter 4.5 cm in diameter) and place on the prepared baking trays. Bake until starting to colour 10-15 minutes. Allow to cool for 5 minutes on the tray then transfer to a cooling rack.
  3. Mix together the icing sugar and enough lemon juice to make a good consistency for spreading or dipping the cooled biscuits in. It needs to be runny enough to spread but not too runny or it will just glide off and make a mess. Allow to set, then place in a tin. Enjoy ♥lemon and chai
Categories: Biscuits, Recipes, Sweet | Tags: , , , , , , , , , , , , | Leave a comment

Bakewell Puddings Old Style

They may not look pretty but they taste great! Combining the flavours of the Bakewell Tart we know with the look and texture of a custard tart. They are my take on the original Bakewell Pudding, from Derbyshire and still being made in vast quantities there.
I decided individual puddings were how I wanted to go with these and buying puff pastry just makes sense too. They puff right up in the oven then deflate once out looking like rather sad Yorkshire puddings, don’t worry they’re supposed to be like that.
Perfect with a cup of tea and great for sharing. I hope you get chance to try them.

Bakewell pudding3

Bakewell puddings Old Style (click title to print recipe)

Ingredients

One sheet of ready rolled puff pastry (375g)

2 eggs plus another 2 yolks

115g melted butter

50g caster sugar

50g soft brown sugar

50g ground almonds

A few drops of almond flavouring (optional)

75-100g jam, strawberry, raspberry, blackcurrant, cherry or whatever you have

Preheat oven to 180C° C 160°C Fan GM4

Makes 12-15

Bakewell tray 1Grease the holes in a muffin/cupcake tray

  1. Cut out pastry with a circle cutter about 9cm in diameter. Place in each of the holes in the muffin tin. Press down so it’s a snug fit to the bottom. The sheet of pastry I used just made 12 rounds, I used the off-cuts to patchwork another 3 in another greased muffin tin. Spread a little jam in each, about a teaspoon.

2. Whisk the eggs, including the 2 extra yolks, on a med/high speed until fluffy and light. This takes about 3 minutes. Then whisk in both the sugars, ground almonds and almond flavouring if using. Whisk to combine. Still whisking on slow/medium add the melted butter, gradually pouring in.

Bakewell Tray 23. Pour in to the pastry cases, until almost to the top. Bake until puffed up, firm to the touch and golden brown. About 20 minutes. Place the muffin tins on a cooling rack and leave to cool. They’re easier to remove from the tin once cold but they are also delicious still a little warm, what a dilemma! Enjoy ♥


Bakewell Tray 3

Bakewell pudding1

Bakewell pudding2


Categories: Cakes, Pudding, Recipes, Sweet | Tags: , , , , , , , , , , , , , , | Leave a comment

Hint of Christmas Cookies

These scrummy cookies are nice and easy to make, I hardly had chance to take any photo’s of these before they disappeared! You can vary the end result by leaving some as a ball of dough as some people like a softer cookie rather then a crunch.  With cranberries and cinnamon it must be nearly Christmas.

Download the recipe: hint-of-christmas-cookies

christmas-cookies-star


110g soft butter
100g caster sugar
50g demerara sugar
1 egg, lightly beaten
1 ½ tsp ground cinnamon
150g self raising flour
30g oats
75g dried cranberries
Makes 20-24 cookies
Preheat the oven 180°C 160°C Fan GM4

Grease or line a few baking trays.

christmas-cookies3Beat the soft butter and the sugars until light and fluffy. Add in the egg and beat well. Sieve in the cinnamon and flour, add the oats and cranberries and bring everything together until just mixed.

Place balls of dough weighing about 25g on the prepared baking trays, for thinner crisper cookies flatten with your palm. For a denser, more cakey texture leave as a mound. Allow room for spreading.

Bake until golden, about 10 minutes. Allow to cool for 5 minutes on the baking tray and then when firmed slightly move to a cooling rack.

Store in an airtight container. Enjoy with a cuppa ♥

christmas-cookies

Categories: Biscuits, Christmas, Recipes, Sweet, Uncategorized | Tags: , , , , , , , , , , , , | Leave a comment

Ricciarelli Hearts

I made my version of these 4 or 5 years ago doing research for a magazine article. They are delicious and very moreish. Originally a macaroon style biscuit form Siena in Italy and often given as Christmas gifts. As I have a love of most things Italian they are a staple on my baking list!


ricciarelli-rice-paperI decided to change the tradition shape from a lozenge to heart shaped and to use some lovely coloured rice paper (wafer paper) sheets I bought from Squires Kitchen earlier in the year.

Download the recipe here: ricciarelli-hearts

Ingredients 

200g ground almonds
200g icing sugar
1/2 tsp baking powder
2 egg whites
1 tsp vanilla extract
Grated zest of 1 lemon
1 tbsp runny honey
2-3 large rice paper sheets (approx 28 x 18 cm each) coloured if you can get them
A little icing sugar to dust with

ricciarelli-shapedMakes 20

Oven preheat 180°C (160°C Fan) GM4

Sieve the icing sugar in to a large mixing bowl, add the ground almonds and baking powder and stir.

Add in the vanilla, lemon zest and honey and briefly stir through, it will be crumbly and uneven in texture at this stage. It will all come together later when you add the egg whites.

hearts


In a very clean bowl whisk the egg whites until they form stiff peaks. Add the whisked egg whites to the bowl with the other ingredients and mix well until you have a lump of sticky dough. Wrap the dough in clingfilm and place in the fridge for at least 6 hours, preferably overnight.

When you are nearly ready to bake them, preheat the oven. Prepare the rice paper by cutting out some heart shapes. Use the template to help you or make your own measuring about 6cm at the widest across, and about 6 cm from the dip at the top to the point at the bottom. You’ll need 20 of these.

Download the A4 sized template from www.samskitchen.net/wp-content/uploads/2016/12/hearts.jpg

Divide the dough mixture in to 20 fairly equal sizes (I weigh mine to get it equal), then using your hands shape them into a rough heart shape to fit on the rice paper , so they are just inside by a few millimetres all round (they expand over this when baked). Repeat with them all. Place them on the baking trays making sure you leave a gap around each. Dust with icing sugar.

Bake for about 10 minutes until golden. Leave to firm up for a few minutes on the baking tray then transfer to a cooling rack. They keep well in a tin and actually taste even better the day after baking. Enjoy ♥

   ricciarelli-above ricciarelli-baked ricciarelli-3


Categories: Biscuits, Cakes, Christmas, I ♥ Italy, Recipes, Sweet | Tags: , , , , , , , , , , , , , , , , , | Leave a comment

Melting Chocolate Moments

These are like Viennese fingers or whirls but all chocolate! Very crumbly melt in the mouth biscuits sandwiched together with dark chocolate ganache. I use fairly reasonably priced chocolate from the supermarket for most of my baking, saving the good stuff for eating straight 🙂


Melting Chocolate Moments

Cookies

175g soft butter

55g icing sugar

1 tsp vanilla bean paste

150g self raising flour

25g cocoa powder

Ganache filling

200g dark chocolate, chopped

150ml double cream

15g butter

25g melted white chocolate to drizzle (optional)

Makes about 15 large or 30+ small complete cookiesmelting-choc-2

  1. Make the ganache first so it has time to cool and firm up a bit. Heat the cream in a small saucepan to boiling point. Remove from the heat and add the chopped chocolate and butter. Stir through until all melted together. If there’s still a few lumps place over a low heat and stir until all gone. Set aside to cool. Place in the fridge in a container until ready to use as filling.
  2. melting-choc-1Preheat the oven 180°C 160°C (fan) GM4. Beat the butter until soft and creamy. Add the sieved icing sugar and vanilla bean paste, beat together until combined and smooth. Add in sieved cocoa and flour and bring together, either by beating briefly with your mixer or by wooden spoon or spatula. Make sure it’s an even colour and there’s no lighter streaks.
  3. Prepare a piping bag, for the larger ones I used an Ateco 866 pastry nozzle and the smaller ones a Wilton 1M. You’ll get a different look if you use other nozzles so try a few. Place some of the cookie mix in the piping bag. Pipe lengths of about 5-6 cm onto a lined/greased baking tray. The piping is hard work as the mixture is quite stiff, ensure your piping bag is strong and the butter is really soft at the start, this will help. Make sure you give them room to expand in the oven. Bake until just starting to colour at the ends about 10-12 minutes for the larger ones a few minutes less for the smaller ones. They will be firm to the touch, be careful not to over bake them, they burn quickly and it’s not easy to tell as they’re already brown!
  4. melting-choc-aboveLeave to cool completely on the trays. The cookies are very fragile, especially so while still warm. Once cooled use a small spatula or knife to move them. Pair them up so they’re roughly in pairs of the same size and shape. Turn over one half of the pair, if you’re using the white chocolate drizzle across the tops now, or wait until you’ve assembled them, either works. I used a piping bag with a small snip at the end or use a spoon.

5. Fill another piping bag with the cooled ganache filling, it needs to be a soft spreadable and pipeable consistency. If it’s too sloppy place in the fridge for a little while, if it’s too stiff heat very briefly in the microwave and stir, repeat until you are happy. Place some in the piping bag and fill the upturned cookie with a line of luscious filling, pop the top on and leave until the white chocolate is set. Enjoy ♥

melting-chocolate-momentsmelting-choc-4

Categories: Biscuits, Recipes, Sweet | Tags: , , , , , , , , , , , , , , , , | Leave a comment

Food Photography Lighting Ideas


Although I love using natural light for a lot of my food photography, sometimes it’s just not an option. The UK has many days when the sun does not appear and when it does it’s not for long enough! So I have a few lights at hand to make sure I’m not limited.

aimg_1788

The Pixapro Glowpad 350 works really well for me and also means I can control where the light is used and how much light. It’s amazing how much difference moving the light makes to the end result.

aimg_1776

Check out my video to how see how I created the images.


Categories: Cakes, Food Photography, Foodie Chat, Sweet | Tags: , , , , , , , , , , , , , , , , , | 2 Comments

Mini Break to Lacock, Wiltshire.

img_20160927_125758

My other half, Gavin, and I recently had a cheeky mid week break away to Lacock in Wiltshire.

It’s somewhere I had heard about for a while and at last managed to get a couple of nights booked for late September.

The village is stunning and rather unique being almost entirely owned by The National Trust. This means it has an unspoiled appearance.

I did lots of research on somewhere to stay and decided in the village itself was where I wanted to be. There are just a handful of places as it’s only a small village and I chose the Lacock Pottery B&B. The reviews are brilliant and it looked my sort of old and quirky!


The hosts Simone and David are lovely, so interesting and friendly and very knowledgeable on all sorts, especially the local area as they’ve lived there for over 30 years.

We made friends with Kevin the guinea fowl that seems to have adopted the pottery as his home (or her no-one is sure!).

We had candlelit breakfasts in front of an open fire, this felt so special and very indulgent! With homemade bread and jams this was a particular highlight.

We visited the Abbey which was beautiful and also boasts the Fox Talbot Museum (photographic negative inventor) and generally relaxed and enjoyed the break.

There were little stalls to buy things from outside houses; I ended up with snacks, flowers and books to take home. Also a few gift shops and of course the stunning houses and streets to wander along.

Because there was a distinct lack of street lights (unlike home as we live close to Gatwick airport) we used torches in the darker areas in the evening but also Gavin took this as an opportunity to take a few star trail images. This involved sitting in the church yard in the pitch black and resulted in some amazing images.

lacock-startrails-1

Two nights was the perfect amount of time to relax and sample the local delights. We left with homemade wine and a box full of apples from our hosts. Check out my  Pookies recipe made with some of the apples. I highly recommend Lacock and staying at the pottery was perfect. ♥

Categories: Food Photography, Foodie Chat, Other, Special days | Tags: , , , , , , , , , , , , , | 2 Comments